Hello--it is Tutorial Tuesday! First off--I want to thank my friend over at monkey's on the bed for being so kind and adding my blog to the tutorial button above. I love making these tutorials and am so excited to be a part of it!
Today, in honor of Lincoln getting ready to crawl, we are making baby leg-warmers. Perfect for protecting those knees from carpet burn (they are also really great for quick diaper changes!).
Step 1: Select a pair of knee high socks. One of the hardest parts of the process is finding knee highs that aren't super girly (obviously not a problem if you have a girl...). Solid colors are generally a good bet, and when it is Halloween, you can find skull and bat prints....
Step 3: Cut off the heel and toe (see pic 2 below). Discard the heel and toe pieces.
You should now have a tube and a small rectangle piece cut from the foot of the sock (see pic 3)
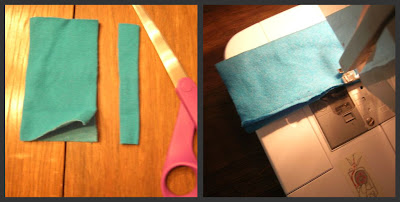
 Step 4: Cut off one side of the small rectangle, about one fingers width. You should now be able to unfold the piece flat. (see pic 1 below)
 Step 4: Cut off one side of the small rectangle, about one fingers width. You should now be able to unfold the piece flat. (see pic 1 below)
Step 5: Fold the flat piece you made so right sides are together and sew the open side closed using a straight stitch. (why did you cut it if you are just going to sew it back together, you ask? Good question. Because this is going to be the cuff of the leg warmer, it needs to be a bit smaller than the width of the tube part of the sock--so we had to remove that finger width piece to make it smaller.) (see pic 2)
Step 6: Fold down top of rectangle piece to form a cuff. Line up the edges so they are even. (see pic 1 below)
Step 7: Feed bottom of tube into the newly created cuff. Right sides of everything should be out. (see pic 2 below)
Step 8: Line up all 3 layers at the bottom (the tube and the 2 layers from the cuff). You can pin if you like. I found pinning to be more frustrating than not pinning, so I don't pin. (see pic 3 below)

Step 9: Stitch the 3 layers together using a straight stitch and 1/4-1/2" seam allowance. Go slow and make sure you are catching all 3 layers!! (see pics 1-2 below)
Step 10: Double check to make sure you caught all 3 layers--if you didn't, go back and fix it. If you miss any layers, there will be a gap when you fold down the cuff. (see pic 3 below)

Step 11: If you have a serger, here would be a great opportunity to put it to use. We want to finish the edges so the don't fray and unravel. I don't have a serger, so what I do is go once around with the overlock stitch on my machine, then do one more time around with the zigzag stitch. When finished, the edges will look like the pic on the left above. I have never had a problem with unraveling.
Step 12: Roll down the cuff and you're done! See how easy? Baby leg-warmers on the cheap.
Lincoln showing off his leg warmers--look at him threatening to crawl. So close!!!
 Yay, made it to my block! So happy my knees aren't rug burned =]
 Yay, made it to my block! So happy my knees aren't rug burned =]
 So, if you made it this far, I have a treat for you! I got a little carried away buying knee high socks during a sale last fall, and have way more than Lincoln will use. So, I would love to give 2 of you readers a pair of homemade baby leg-warmers! Your choice from my stash below:
I have been tiring a bit lately with having so many entry methods for online giveaways, so I am going back to basics here. To enter this giveaway, just leave me ONE comment below--I'd love to hear what you are currently working on creating! What's in your sewing machine, or on your needles, or on your sketch pad, or in your oven, etc. If you aren't currently creating anything, just let me know what you'd like to create! Let's inspire each other!
So, just to be clear, the above method is the only entry method for this giveaway. Nice and simple! Just a comment! I will draw the winners on Friday, June 12, 2009 at 9:00 am, CST.
Enjoy! And have a wonderful Tuesday!
PS: Don't forget to check out these other awesome tutorials today:
Natural Cleaners at monkeys on the bed
Artisan Bread in 5 minutes a day at Sailing the Hudson


love it! and love that you are giving things away, too! How cool! i tried to make these before but failed miserably--because they weren't knee highs! they were just calf-highs so they didn't work. Good to know!
ReplyDeleteUmmm in my crafty project bin i have some onesies and some flower headbands to make for new baby girls that just arrived!
As always love your blog...
ReplyDeleteI'm thinking of creating a waterproof pad for the bed when I co-sleep in case someone I know...small, blonde with seven teeth...doesnt wet my bed. Was thinking nice cotton on one side and some cute PUL on the other.
Otherwise Im getting ready for my hubby to finally come home and working hard on graphic projects for work!
Sailor has a pair of Kelly made Leg Warmers and loves them.
ReplyDeleteToo bad I don't have a crafty bone in my body though I do grow things pretty well.
I have Tutorial Tuesday going on @ http://sailingthehudson.blogspot.com/
Those are so neat. I don't know how you find the time to do all this creative stuff. I'm worn out. :)
ReplyDeleteI am working on a better more healthy way for my Hubby and I to eat.
I'm working on a scrapbook page about Charlotte's first food. I'm also making her some soft blocks.
ReplyDeleteappetizerforacraftymind(at)yahoo(dot)com
Great tutorial Kelly, I have to admit I have purchased all of my baby leg warmers but might take a stab at it now with your tutorial.
ReplyDeleteI am currently making a sock monkey for Holden and will post how it went when I'm finished.
ourcatcherintherye@blogspot.com
My little man would LOVE a pair of these! I too am not crafty and feeling a little overwelmed with keeping up around here :)
ReplyDeleteThis is my first time here--LOVE your blog. Wandered over here from Monkeys on the Bed.......
Love your tutorial! I did buy all my Babylegs. Now, I'll see if I could make them myself! Of course, I'm not very crafty, lol!
ReplyDeleteI love your babylegs! I wish I could work a sewing machine better. I have been making cute bows for my daughter's hair and I LOVE to bake. To see the bows or try one of my favorite recipes, check out my blog www.munchkinfarm.blogspot.com!
ReplyDeleteI'm not great at creating things... I'm more about organizing things. I'm working on organizing my homeschooling space (preparing for next year), and I'm sure there will be creative projects that arise with that! I do make my own "green" cleaning supplies, and I made the deodorant you blogged about last week (and LOVE it!!!). Wish I would have known how to make the babylegs a little more than a year ago! Now my son is a full fledged toddler! But if I win a pair, I have a nephew to be born in September! :)
ReplyDeleteI don't own a sewing machine, so I have to post a comment to get one of these! We have 3 pairs that we bought, and Sophie wears them all the time as she is a crawling MACHINE!
ReplyDeleteOoh, and I made the banana-chocolate chip bread the other day. I used gluten-free flour to adapt it to my diet. It was very tasty, but all of the chocolate chips sank to the bottom. How do you prevent that from happening?